HTTP
The HTTP integration sends every uplink of the application's devices as a POST request to the address you specify. The body is JSON of the same form as the WebSocket API realtime_data message. An external system only needs an HTTP server that accepts POST requests — no WebSocket API connection is required for this. The integration works in one direction: you cannot send a downlink through it. The integration is set up on the application page of the web interface; an application can have one HTTP integration.
How to connect
- Open the application in the "Applications" section of the web interface. The "Integrations" block is shown only on the page of an existing application, not on the create page.
- In the "Integrations" block, click "Add" on the HTTP card.
- Fill in the fields, see the table below. "Endpoint" is required.
- Turn on the "Active" switch. It is off for a new integration, and the server does not start a disabled integration.
- Click "Save". The form marks an invalid address but does not block saving: without "Endpoint" the server does not save the integration, and an address without
http://orhttps://or without a host name is saved, but the integration does not start — an integration that is already running keeps its previous settings.
The server applies saved settings immediately, without restarting the service: it restarts the integration with the new configuration. To change the settings, click "Edit" on the card; to delete the integration, click "Удалить" (Delete) and confirm. The "Add" button is shown only while the application has no HTTP integration.
Integration fields
The form labels are in English in both the English and the Russian interface. The fields are grouped into the "Connection Settings", "HTTP Headers", "Basic Authentication" and "Integration Control" sections. When editing, a "Status & History" section is shown below them, see State and request history.
| Field | What it sets |
|---|---|
| "Endpoint" | The address the server sends requests to. Must start with http:// or https://, otherwise the form shows "Endpoint must start with http or https". An address with another scheme or without a host name is saved by the server, but the integration with it does not start. The server sends the request to the address exactly as written: it appends nothing to the path or the query |
| "Verify SSL Certificate" | Verification of your HTTP server's certificate over https. On by default. Turning the switch off disables both the certificate and the host name checks; the form warns "SSL verification disabled - use only for testing", and the server writes a warning to its log |
| "HTTP Headers" | Your own request headers. To add a header, enter "Header name" and "Header value" and click "Add" — the button is enabled when both fields are filled in. The pencil changes only the value; to rename a header, delete it and add it again. Rows can be dragged to reorder them |
| "Basic Authentication": "Username", "Password" | Credentials for the Authorization: Basic header. The section is optional (marked "optional") and expands when you click its title. Collapsing the section clears both fields. With an empty "Username" the server does not add the Authorization header |
| "Active" | Enables the integration. Off for a new integration |
The form hides the values of headers whose names contain authorization, api-key, x-api-key, token, secret or password (case-insensitive), leaving the first and last two characters visible in values longer than 6 characters; the eye icon shows them.
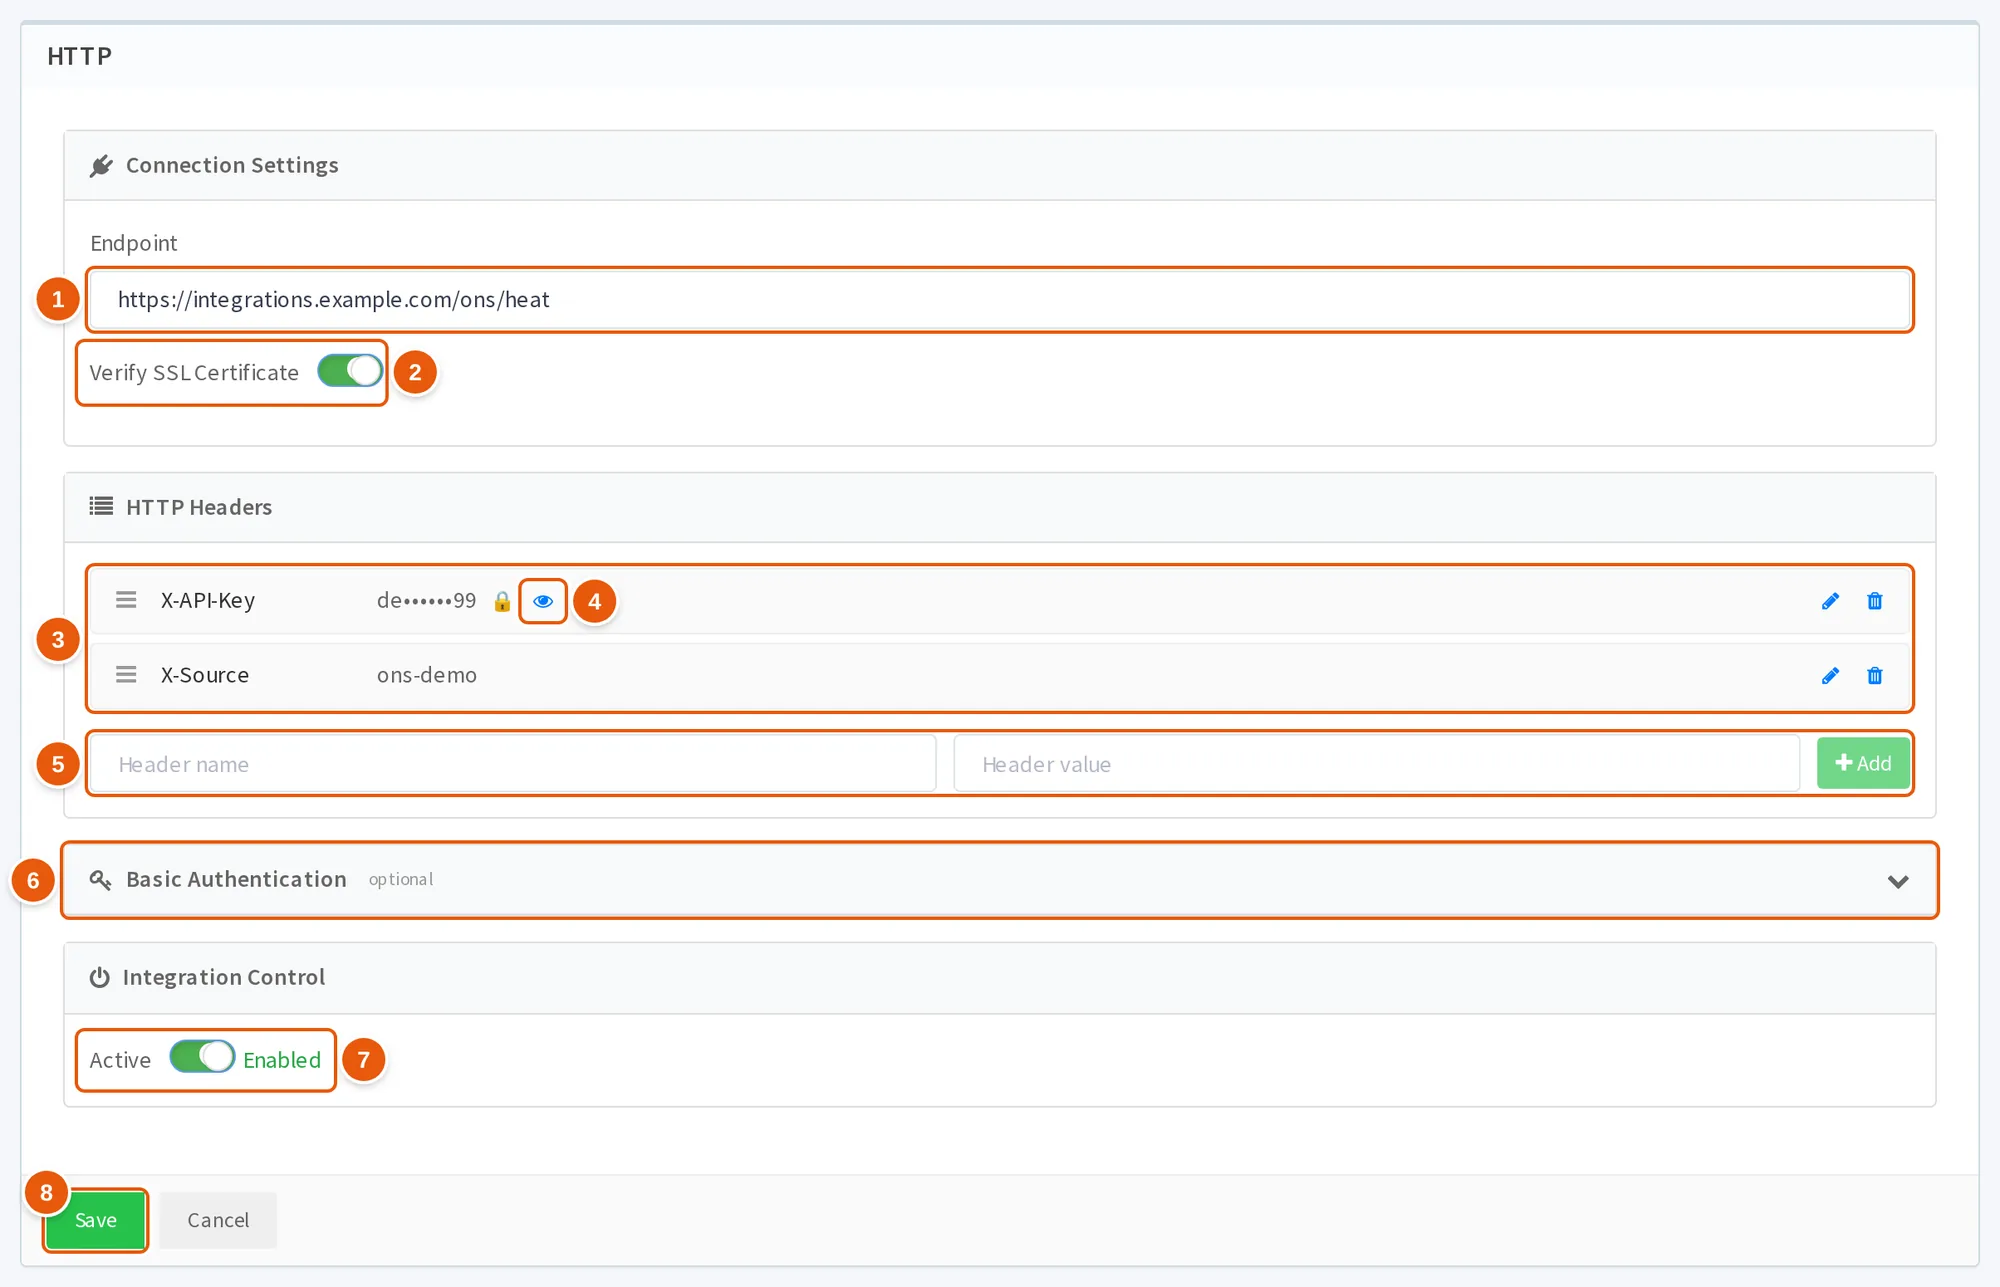
- Endpoint — the address the server sends requests to; required.
- Verify SSL Certificate — verification of your HTTP server's certificate over
https, on by default. - HTTP Headers — the added headers: a row can be dragged, the pencil changes the value, the trash icon deletes the header.
- Eye icon — shows the hidden header value, here
X-API-Key. - Header name, Header value and Add — add a header; the button is enabled when both fields are filled in.
- Basic Authentication — an optional section with the "Username" and "Password" fields, expands when you click its title.
- Active — enables the integration; off for a new integration.
- Save — saves the integration; the server applies the settings immediately.
Request: address and headers
For every uplink the server sends one POST request to the "Endpoint" address. Request headers:
| Header | Value |
|---|---|
| Headers from "HTTP Headers" | Values as set in the form; the server changes the letter case of names: X-API-Key is sent as X-Api-Key |
User-Agent | OnsHTTPClient |
Content-Type | application/json, without charset |
Authorization | Basic <base64 of "username:password" in UTF-8>. Only if "Username" is filled in |
The server sets User-Agent, Content-Type and Authorization: Basic after the headers from the form and replaces headers with the same names.
To pass a token, leave "Username" empty and add a header in "HTTP Headers", for example Authorization: Bearer <token> or X-API-Key: <key>.
Request body
The body is JSON of the same form as the WebSocket API realtime_data message: cmd with the value realtime_data, devEui, devAddr, data (the frame, reception parameters, JS codec result, tags), battery_level, margin, join_request_time. The execResult and execError fields are present only if the application has a JS codec. The meaning of every field is in the description of the realtime_data message.
{
    "cmd": "realtime_data",
    "devEui": "6F1E570FFE14DBFC",
    "devAddr": "78130AE1",
    "data": {
        "datr": 5,
        "rssi": -97,
        "lsnr": 8.5,
        "data": "0A1B2C3D4E5F6071",
        "freq": 868.9,
        "time": "2026-10-08T09:47:18.528002",
        "ack": false,
        "size": 21,
        "gatewayId": "0000B827EBFD64DE",
        "adr": true,
        "fcnt": 1542,
        "mtype": 2,
        "fopts": "",
        "fport": 2,
        "packet_loss_rate": 0,
        "execResult": {
            "errors": [],
            "warnings": [],
            "data": {
                "temperature": 21.5
            }
        },
        "execError": null,
        "tags": {
            "building": "A"
        }
    },
    "battery_level": 100.0,
    "margin": 9,
    "join_request_time": "2026-10-01T06:12:40.114233Z"
}
Non-ASCII characters — for example, Cyrillic in tags or in the codec result — arrive escaped: \u0410 instead of "А".
The server sends every received uplink — confirmed and unconfirmed — from the devices of its own application and of the applications in the "Accessible apps" field. The integration sends no other messages.
Response and retries
The server waits 5 seconds for the response headers; the timeout cannot be changed.
| Response | What the server does |
|---|---|
| Code below 400, including 3xx | Treats the uplink as delivered and sends the next one |
| Code 400 or above | Error HTTP error <code>: <status text>, retries the same uplink |
| No response within 5 seconds | Error Request to <address> timed out after 5 seconds, retries. The server does not cancel the request itself: your HTTP server may still process it, and then the uplink arrives twice |
| Connection or TLS error | Retries the same uplink |
On a retry the server stops reading the integration queue, waits for a pause and sends the same uplink again. The pauses are about 20, 40, 80 and 160 seconds, then 300 seconds (5 minutes) each time; up to 10% is added to every pause. There is no attempt limit. After a successful response the pause sequence starts over.
The integration sends requests one at a time: the next one only after the response to the previous one. So the sending rate is limited by the response time of your HTTP server: if it responds in 0.5 seconds, the integration sends at most two uplinks per second.
The server does not use the response body and does not record it in the request history, but it does read it — the requirements for it are in the "How to receive requests" section.
How to receive requests
- Respond with a 2xx code to every request, even if you could not parse the message. The server retries a 4xx or 5xx response indefinitely. Log the parse error on your side.
- Respond within 5 seconds: store the message, respond, and only then process it.
- Respond with
204 No Contentor with200and an empty or short UTF-8 body. A body that is not valid UTF-8 breaks delivery: the request is counted as an error or never completes — the integration then stops sending uplinks without retries, while the card still shows Connected. The server also counts as an error a response withoutContent-Lengthand without chunked encoding, whose end is marked by closing the connection. Common web frameworks sendContent-Lengthor chunked by themselves. - Remove duplicates, for example by the pair
devEuianddata.fcnt: after a timeout the same uplink arrives again.
State and request history
The icons in the HTTP card header show whether the integration is enabled (the switch) and its state:
| State | What it means for HTTP |
|---|---|
| Connected, green check mark | The integration is enabled and ready to send requests. It does not confirm that your HTTP server is reachable: Connected appears right after the integration is enabled, even if the address does not respond |
| Disconnected, yellow cross | For an enabled integration — a pause before a retry after a failed request. The cause is in "Recent Requests" |
| Error, red triangle | Does not appear in practice: after a failed request the server immediately records Disconnected |
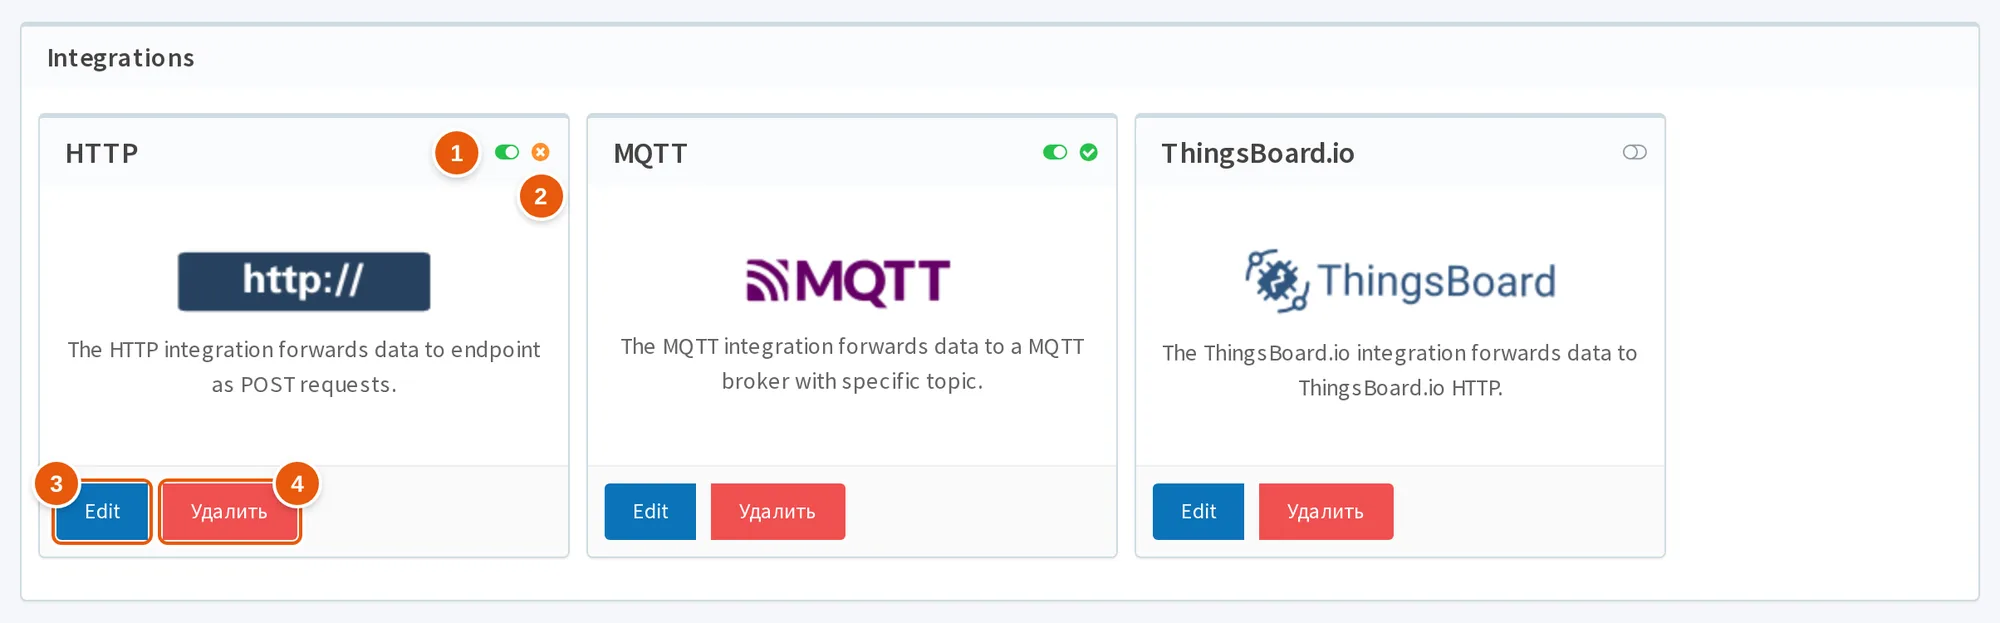
- Switch — the integration is enabled (green) or disabled (grey, as for ThingsBoard.io).
- State — here Disconnected, a yellow cross: a pause before a retry after a failed request. MQTT shows Connected, a green check mark.
- Edit — opens the integration form and the "Status & History" section.
- Удалить (Delete) — deletes the integration after confirmation.
The "Status & History" section is opened with the "Edit" button:
| Element | What it shows |
|---|---|
| State | Connected or Disconnected, as on the card |
| Counter with a check mark | The number of successful requests |
| Counter with a cross | The number of errors. It counts only until the first successful delivery and shows 0 after it |
| "Last success" | The time of the last successful request |
| "Recent Requests" | The last 5 requests: time, response code or ERR, duration in milliseconds. Clicking a row shows the error text and the request JSON |
- A successful request is recorded with code 200, whatever code below 400 your HTTP server returned; the history has no response body.
- A failed request is recorded as
ERRwith the error text:HTTP error 500: Internal Server Error,Request to … timed out after 5 secondsor a connection error. - The history is kept for 24 hours after the last request: if there were no uplinks for a day, it is empty. If there is neither a state nor history, the section shows "No data yet. Status and history will appear after device uplinks are processed."
- The data is loaded when the application page opens and after the integration is saved or deleted. To see fresh data, reload the page in the browser.
Example: the HTTP server responded with 503, the retry got no response within 5 seconds, and the integration is waiting for the next attempt:
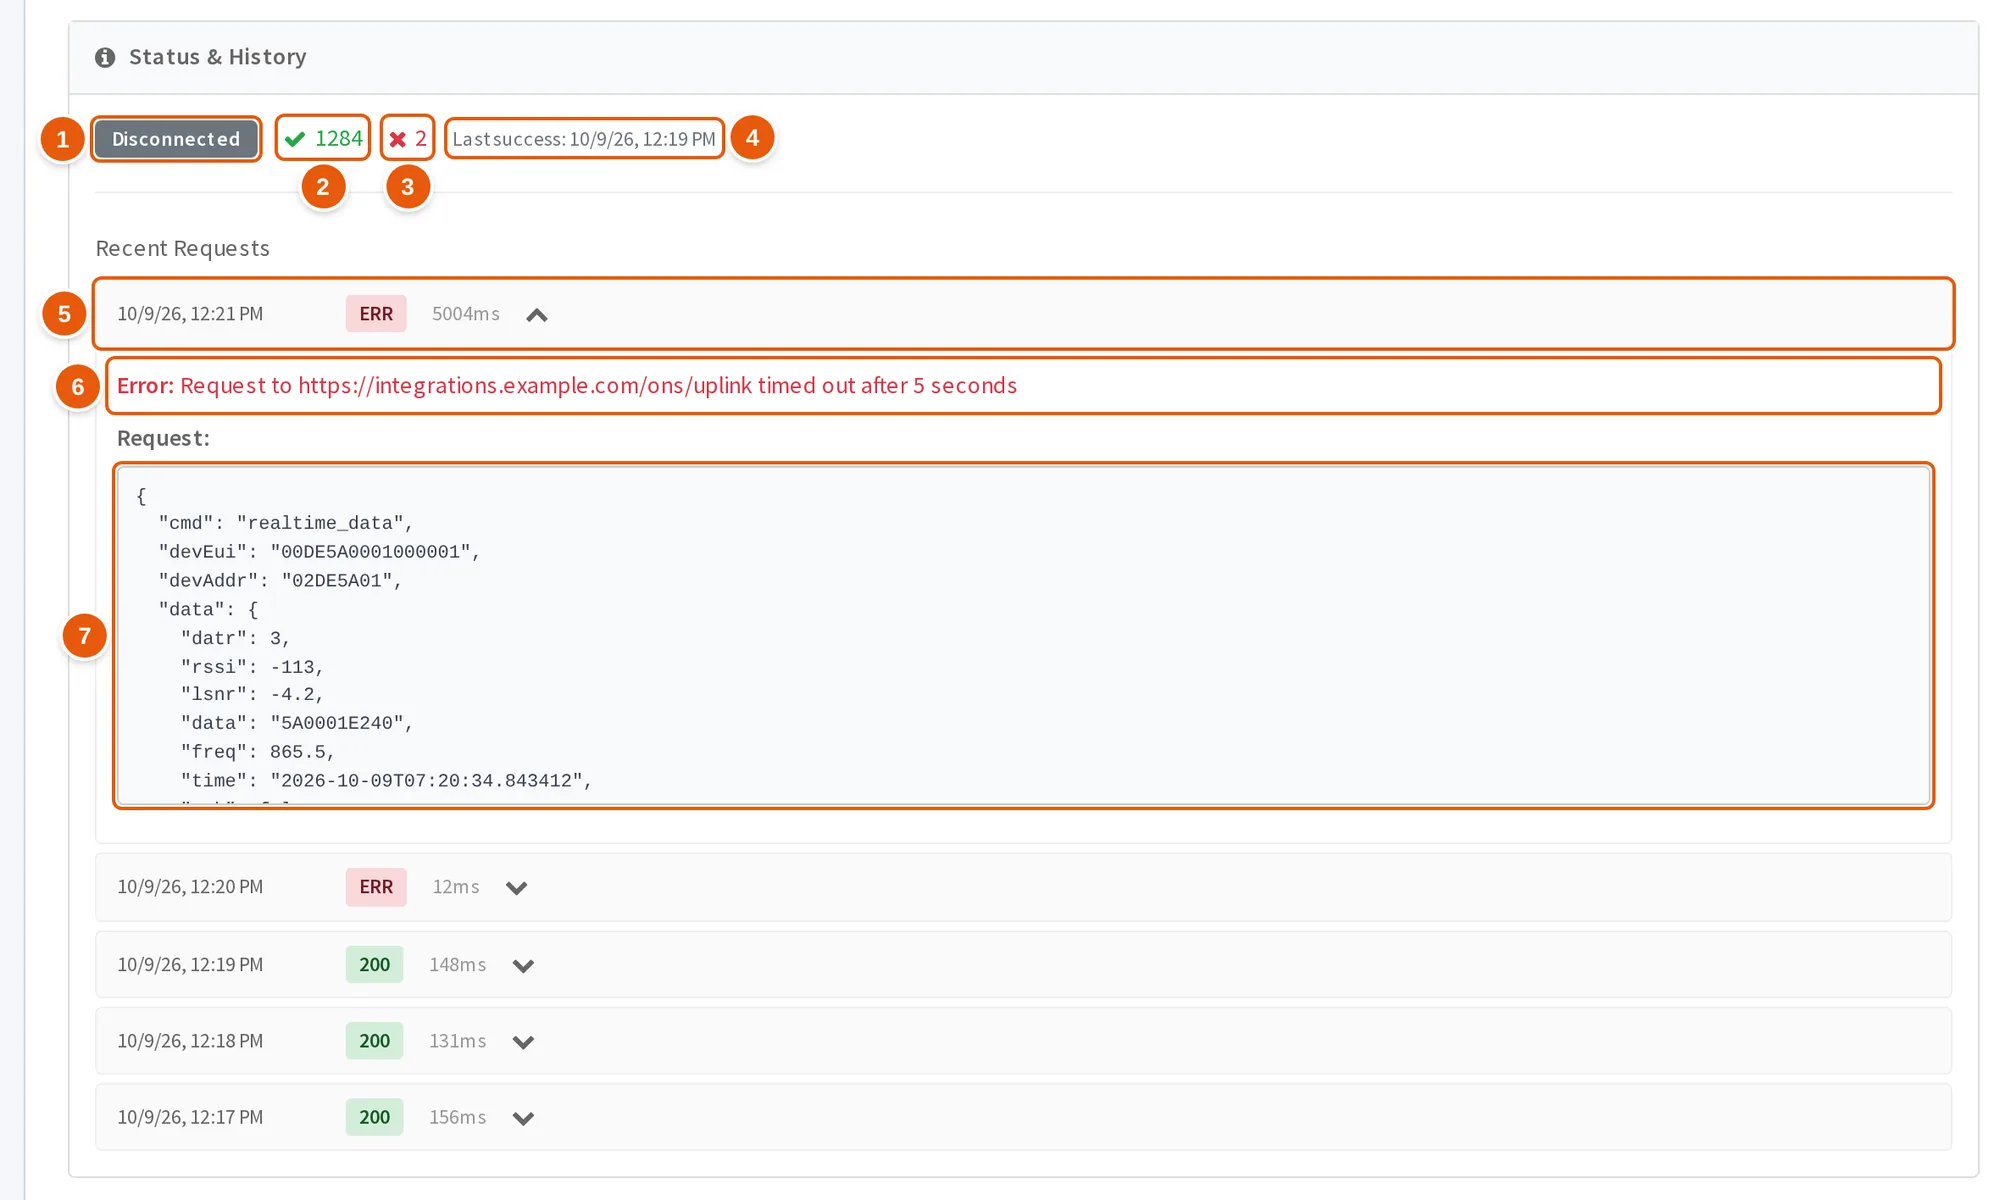
- State — Disconnected: a pause before a retry.
- Counter with a check mark — the number of successful requests.
- Counter with a cross — the number of errors; shows 0 after the first successful delivery.
- Last success — the time of the last successful request.
- Recent Requests — a request row: time, response code or
ERR, duration in milliseconds. Clicking expands the row. - Error — the error text, here
Request to … timed out after 5 seconds. - Request — the request JSON.
Turning off and deleting
- A disabled integration sends no requests, but uplinks for it accumulate on the server. After it is enabled, the server sends everything accumulated — possibly as a large burst of old uplinks.
- An unread queue lives for 14 days. By default the queue is deleted together with its data if nobody reads it for 14 days. Lost uplinks can be fetched with the
get_data_reqcommand. - Deleting an HTTP integration does not delete its queue. Uplinks keep accumulating until the queue has gone unread for 14 days. A new HTTP integration of the same application created within this period first sends the accumulated uplinks.
- Turning off may not take effect immediately. If you turn off, delete or re-save the integration during a pause before a retry, then after the pause — up to 5.5 minutes later — the server may start sending requests again with the previous settings. The same can happen if a request was waiting for a response at that moment and then failed. Check your HTTP server's log to make sure the requests have stopped.
Sending data to a device
The HTTP integration accepts no downlink commands and sends no frame statuses. To queue a frame for a device, use the WebSocket API command downlink_data_req or the MQTT integration: it accepts downlink commands from the broker. An application can have both an HTTP and an MQTT integration.
Good to know
- An error holds back all uplinks of this integration. While your HTTP server responds with a code of 400 or above or does not respond, the integration keeps retrying the same uplink, and new uplinks wait in the queue behind it. The WebSocket API and other integrations receive data as usual.
- A 3xx response counts as delivery. The server does not follow redirects: the uplink is treated as delivered, and no request goes to the new address. Put the final address into "Endpoint".
See also
- Applications — the application page, the "Integrations" block and the "Accessible apps" field.
- Subscribe to real-time data — the fields of the
realtime_datamessage. - MQTT — an integration that can both deliver uplinks and queue downlinks.
downlink_data_req— queue data for sending to a device.get_data_req— uplink packets from the database for a period.