Applications
An application in ONS groups devices and gives an external system access to their data: you connect to the WebSocket API with the application's App ID and one of its tokens. In the Applications section of the web interface you create applications, set connection limits, issue and revoke tokens, and grant permissions to other users. The "Applications" menu item opens the list at /applications.
Who can see the section
| What | Available to |
|---|---|
| The "Applications" menu item and the section itself | Groups admin, monitoring and the superuser (superuser) |
| The "Add application" button and the "Delete" action | Groups admin, application_admin and the superuser |
| The "Permissions" action | Group dealer and the superuser |
| Changing an existing application and issuing tokens | The application owner, the superuser or a user with the "Change" permission on this application, see User permissions on applications |
| Deleting tokens | The application owner and the superuser |
The buttons and actions in the table are visible only to those who can open the section itself. An account that is only in the monitoring group sees the list but cannot add or delete applications.
Application list
The list contains only active applications that the user owns or has been granted the view permission on. The superuser sees all active applications.
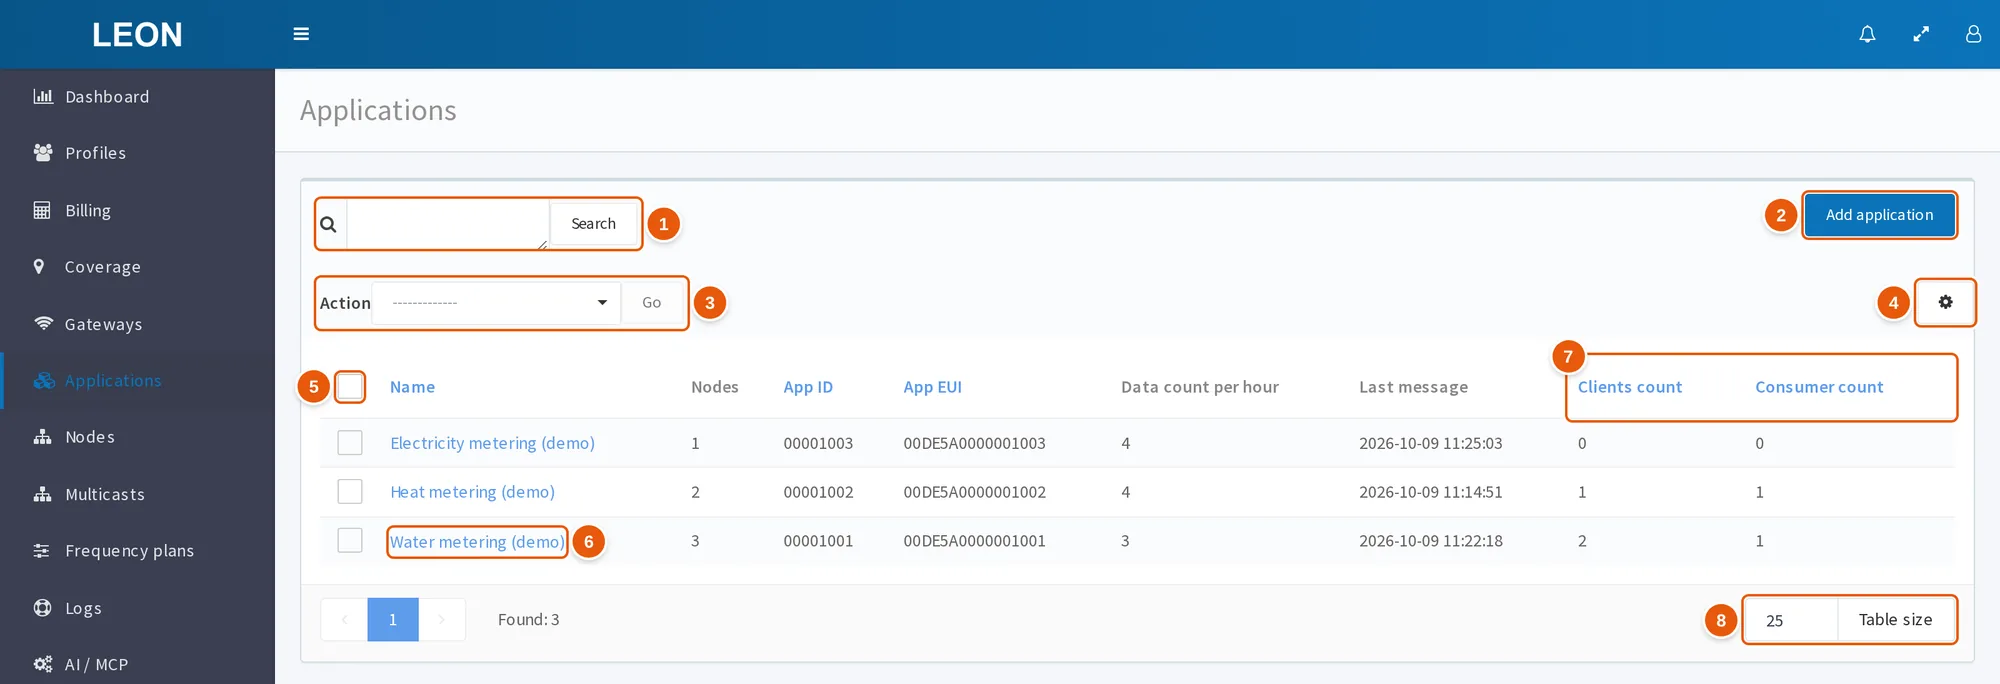
- The search box and the Search button — search by part of the name, App ID or App EUI and by additional field values.
- Add application — opens the
/applications/addpage. - Action and Go — "Delete" or "Permissions" for the ticked rows.
- Table settings (gear) — the "Truncate text" switch.
- The checkbox in the table header — ticks all rows on the page.
- Name — a link to the application page.
- Clients count and Consumer count — open WebSocket API connections and those of them subscribed to data.
- Table size — rows per page, 25 by default.
| Column | What it shows |
|---|---|
| "Name" | The application name; a link to its page |
| "Nodes" | The number of active devices of the application, excluding multicast groups |
| "App ID" | The application identifier, 8 hex characters |
| "App EUI" | The application AppEUI, 16 hex characters |
| "Data count per hour" | Packets of the application over the last hour, excluding downlinks |
| "Last message" | The latest last-data time among the application's devices, in the format YYYY-MM-DD hh:mm:ss |
| "Clients count" | How many WebSocket API connections to the application are open. The WebSocket server maintains this counter |
| "Consumer count" | How many of these connections are subscribed to data. The WebSocket server maintains this counter |
| Additional fields | Fields defined by the administrator |
Search finds applications by part of the name, App ID or App EUI, case-insensitive, and also by additional field values. You can sort by the "Name", "App ID", "App EUI", "Clients count" and "Consumer count" columns: the first click on the header sorts in ascending order, the second in descending order, the third resets the sorting.
A page shows 25 rows by default; to change it, enter a number in the field below the table and click the "Table size" button. The gear menu "Table settings" has a "Truncate text" switch. The browser remembers the search, sorting, table size and truncate mode (localStorage) and restores them the next time you open the list; the list always opens on the first page.
To act on several applications:
- Tick the rows — one by one or with the checkbox in the table header (the whole page).
- Choose the "Action": "Delete" or "Permissions".
- Click "Go".
When all rows on the page are ticked, the "Select all (N)" link extends the selection to all found applications — only if the search box contains text. With an empty search box the action applies only to the rows of the current page, even though the line above the table says "Selected all N". A click with Shift held ticks a range only visually: the action runs only for rows ticked with separate clicks or with the checkbox in the table header.
Creating an application
- In the list, click "Add application" — the
/applications/addpage opens. - The "App ID" and "App EUI" fields are already filled in: the server generates random uppercase values that are not yet used in the database. They cannot be changed, neither on creation nor later.
- Fill in "Name" and, if needed, the other fields — see Application fields.
- Click "Add": the application is created and the list opens.
- Open the new application and add a token — see Tokens and access levels. An application created in the web interface has no tokens.
The page of an existing application has two buttons: "Save" saves the changes and returns to the list, "Save and continue editing" saves and stays on the page. The buttons are active only when the form has changes and all fields are valid. Changing only the "Accessible apps" field does not enable them: change, for example, the "Name" field as well — type a character and delete it. Without the change permission on the application, the buttons are not shown.
Application fields
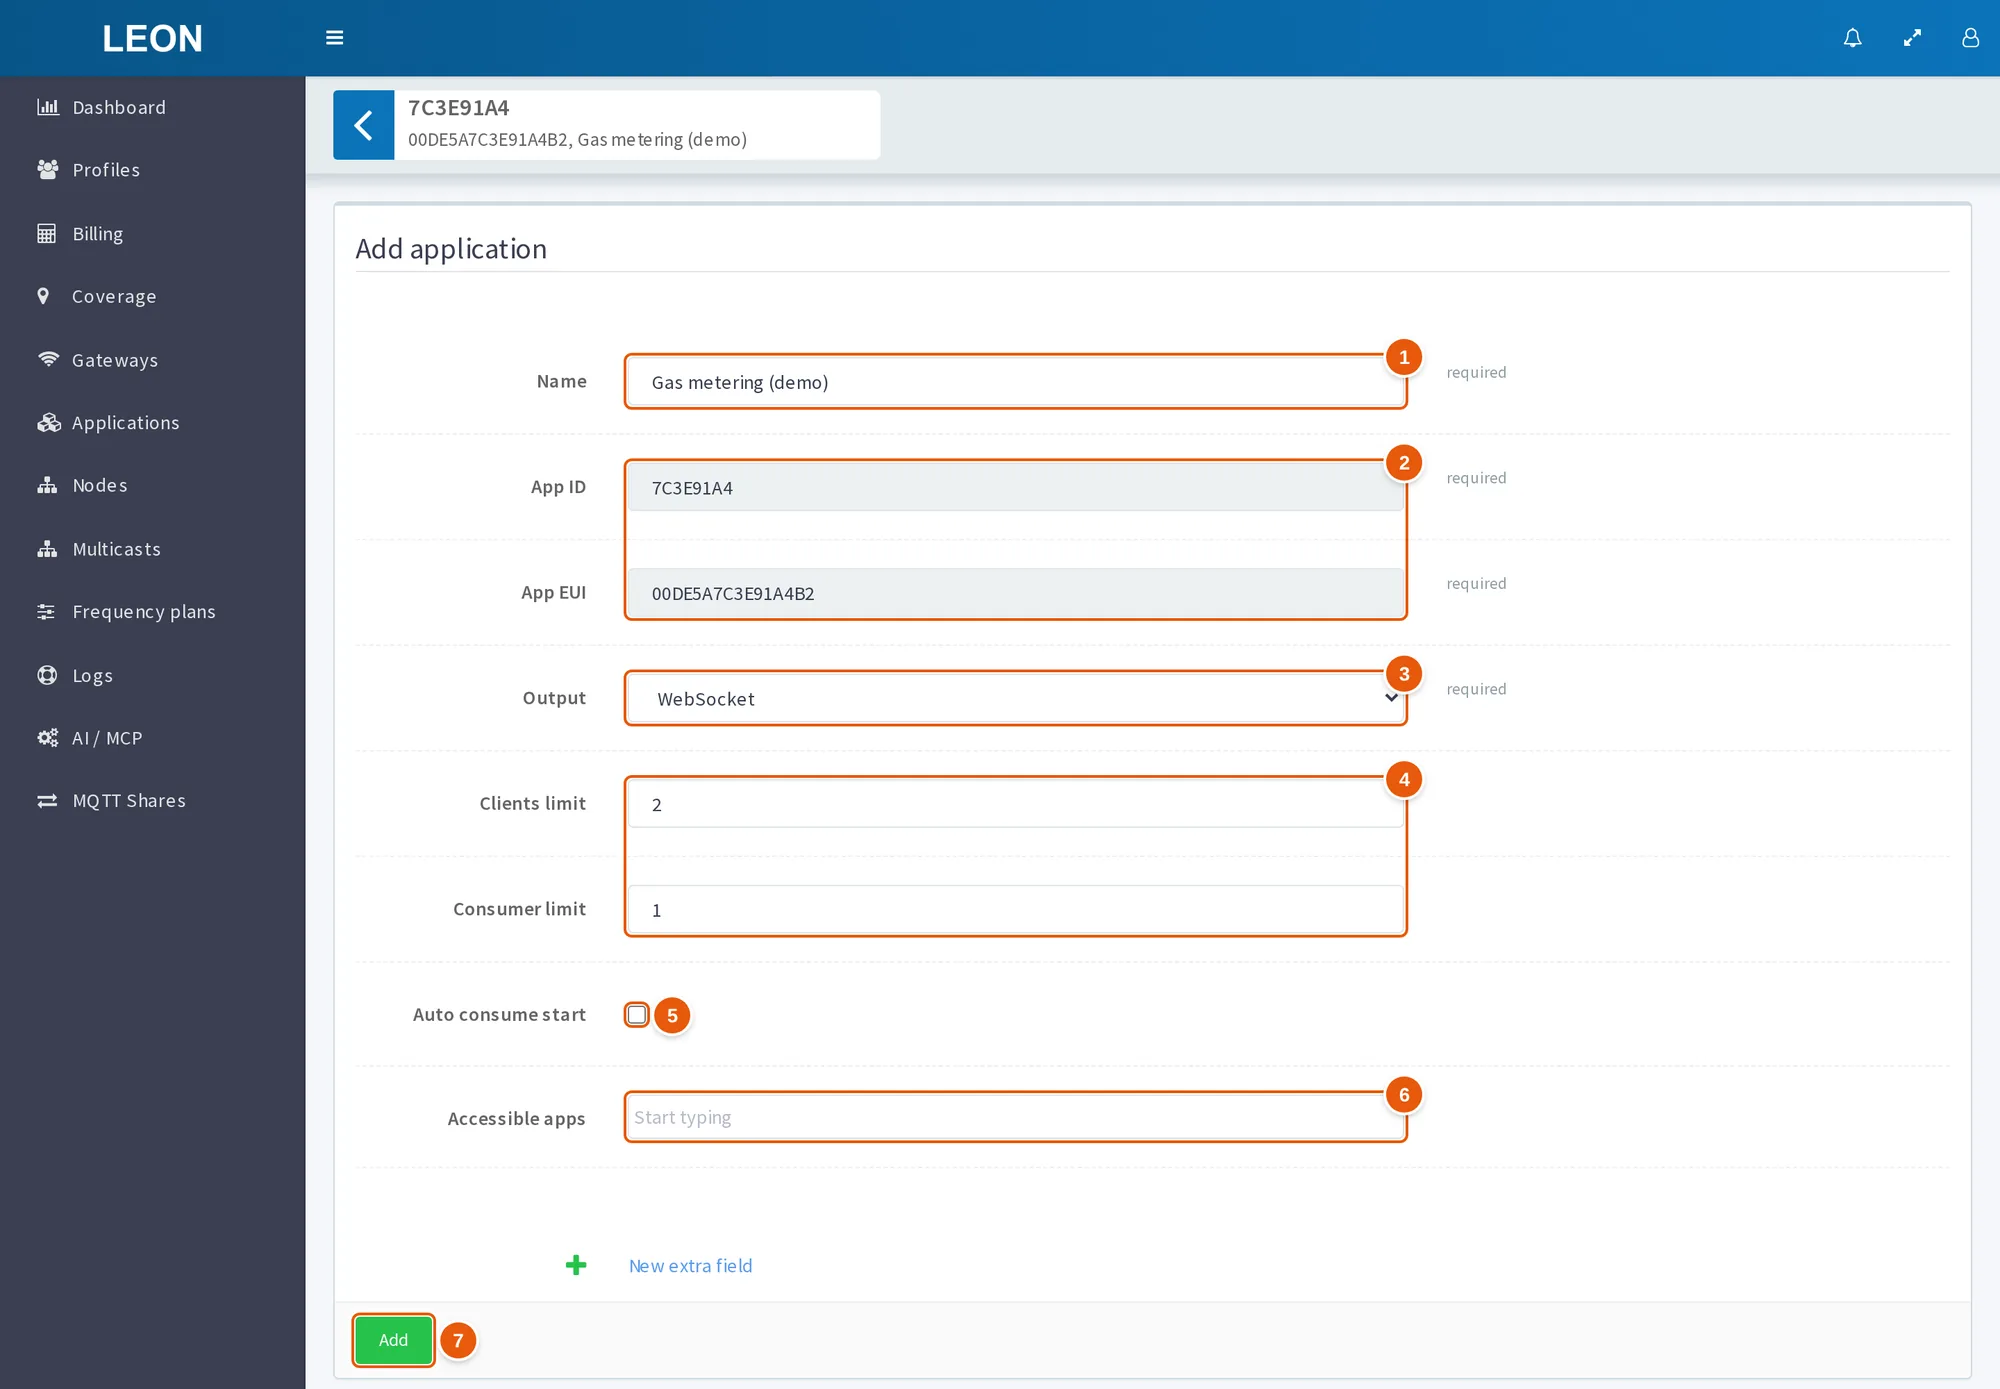
- Name — required, up to 256 characters.
- App ID and App EUI — already filled in by the server, cannot be changed.
- Output — the application output, required.
- Clients limit and Consumer limit — thresholds for WebSocket API connections and subscriptions, 2 and 1 by default.
- Auto consume start — automatic subscription of new connections, off by default.
- Accessible apps — applications whose data this application receives.
- Add — creates the application and opens the list.
| Field | What it sets | Default |
|---|---|---|
| "Name" | The application name. Required, up to 256 characters. Uniqueness is not checked: two applications can have the same name | — |
| "App ID" | The application identifier, 8 hex characters. Generated by the server, cannot be changed | Random value |
| "App EUI" | The application AppEUI, 16 hex characters. Generated by the server, cannot be changed | Random value |
| "Output" | The application output. Required. The list of options is stored on the server | Output number 1 |
| "Clients limit" | Threshold for WebSocket API connections: the server rejects a new connection when more connections than this number are already open. With the value 2, three connections open and the fourth gets error 2 | 2 |
| "Consumer limit" | Threshold for subscriptions: the server rejects a subscription when more connections than this number are already subscribed. With the value 1, two connections can subscribe | 1 |
| "Auto consume start" | Automatic subscription: the server itself subscribes every new connection to data | Off |
| "Accessible apps" | Applications whose data this application receives, see below | — |
| Additional fields | Fields defined by the administrator | — |
An application created with the WebSocket API command create_application_req gets the same values: 2 in "Clients limit", 1 in "Consumer limit", automatic subscription off, the output named WebSocket.
If the selected output has the http_push tag, the form shows an "Output settings" block with a required "Target URL" field. Whether such an output is in the list depends on the server settings.
How the server applies the limits and automatic subscription:
- A connection made when more connections than the "Clients limit" value are already open receives
connectedwith error 2 (Clients count limit reached), and the server closes it — see Connection. - A subscription made when more connections than the "Consumer limit" value are already subscribed fails:
consume_reqgetsconsume_respwith error 1 (Consumer limit reached). - With "Auto consume start" on, the server subscribes every new connection right after
connected, if the subscription limit allows, and sendsconsume_respwithoutoperation_id. A laterconsume_reqon such a connection returns error 2 (Already consumed).
Accessible apps: data of other applications
The "Accessible apps" field lets one application receive the device data of another. If application Y is selected in this field of application X, then:
- connections of application X receive
realtime_datafrom the devices of application Y; - a low access level token of application X sees the devices of application Y and their data — if X and Y have the same owner. If Y belongs to another user, connections of X receive
realtime_datafrom the devices of Y, but the token of X sees neither the devices of Y nor their stored data.
The setting is made on the receiving side — in application X. The link is one-way: application Y does not receive the data of application X. The WebSocket API description calls the applications from the "Accessible apps" field applications "that granted it access".
The picker shows at most the 50 most recently created applications visible to the user, as "name/App ID". Typing filters only these 50 applications: no search is performed on the server.
Tokens and access levels
You connect to the WebSocket API with an application token. The "Application tokens" block exists only on the page of an already created application: the add page does not have it. The create_application_req command, unlike the web interface, immediately issues a low access level token for the new application.
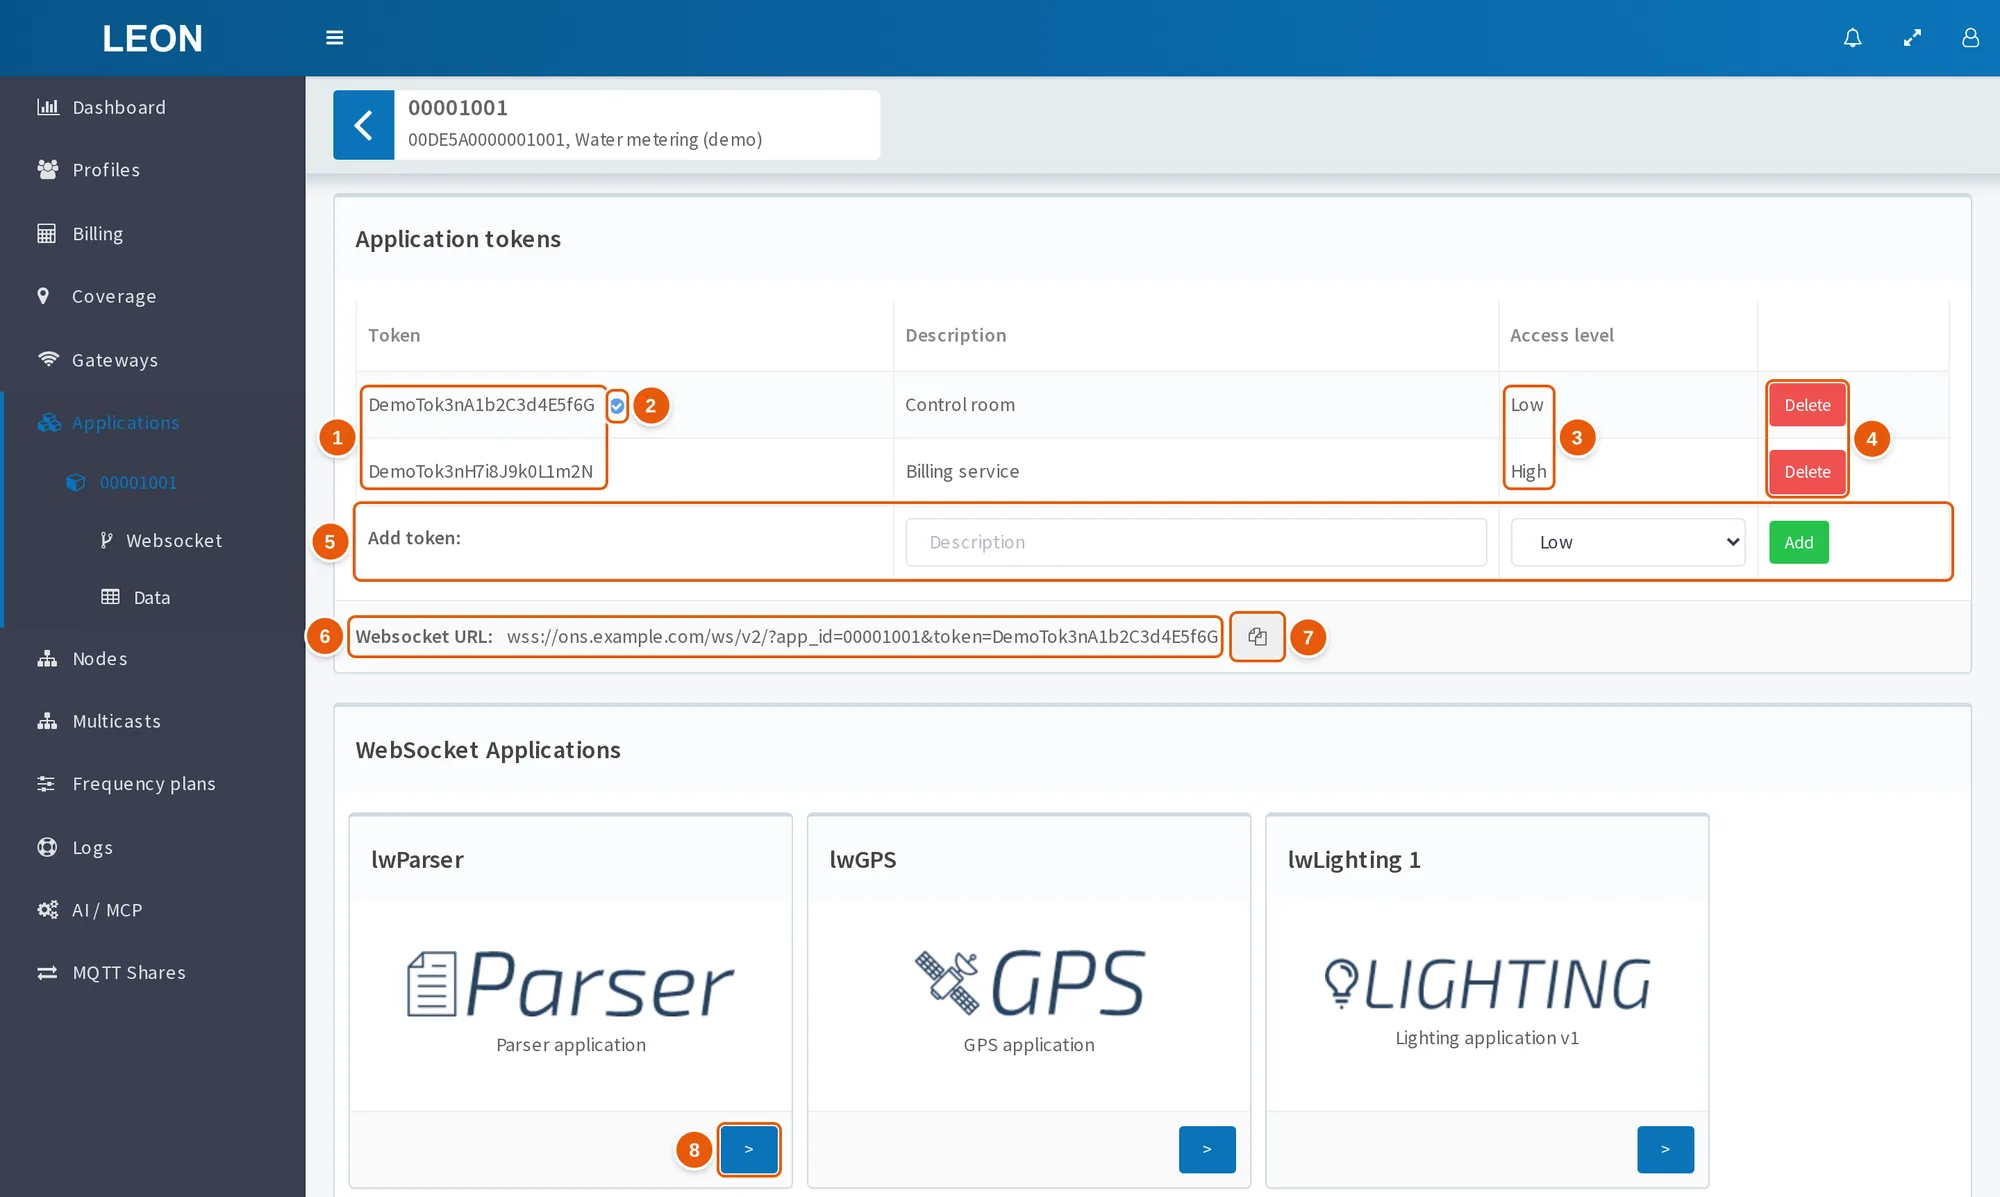
- Token — 22 random characters.
- The check-mark icon "Select token" — which token is used in the Websocket URL line. The icon appears when you hover over the token cell.
- Access level — "Low" or "High".
- Delete — revokes the token.
- Add token — a description, a level and the "Add" button.
- Websocket URL — a ready-made address for connecting to the WebSocket API with the application's App ID and the selected token.
- The button that copies the address to the clipboard.
- The button on a card of the "WebSocket Applications" block — opens the tool with the application's App ID and the first token in the table.
| Column | What it shows |
|---|---|
| "Token" | The token itself: 22 random characters — Latin letters and digits |
| "Description" | A label for the token, up to 255 characters |
| "Access level" | "Low" or "High" |
| "Delete" button | Revokes the token |
| Level | Value on the server | Which devices are visible |
|---|---|---|
| "Low" | 0 | Devices of its own application and of the applications in the "Accessible apps" field |
| "High" | 3 | No such restriction — all devices of the application owner |
What else each level allows is described in Tokens and access levels of the WebSocket API description.
To add a token:
- In the last row of the table, "Add token", enter a description.
- Choose the level: "Low" (default) or "High".
- Click "Add".
To delete a token, click "Delete" in its row and confirm the question "Are you sure you want to delete token …?" — it shows the token itself. The server revokes the token: it disappears from the table, which shows only non-revoked tokens, and the server rejects new connections with it. Once the application has no non-revoked token left, consume_req returns error 3 (Disabled application).
Without the change permission on the application, the "Add" and "Delete" buttons are disabled. A token can be issued by the application owner, the superuser and a user with the "Change" permission on the application. Only the application owner and the superuser can revoke a token: for a user with the "Change" permission the "Delete" button is enabled, but the server rejects the request and an error message appears.
WebSocket API connection address
When the application has at least one token, the line Websocket URL: <address>?app_id=<App ID>&token=<token> appears below the token table. This is a ready-made address for connecting to the WebSocket API.
- The server address is the WebSocket API address set in the ONS server settings; it depends on the installation.
- The address contains the token marked with the check-mark icon in the table (tooltip "Select token"). When the page opens, the first token in the table is marked. Right after you add the first token, the address is shown with an empty
token=: mark the token with the check mark or reload the page. After the selected token is deleted, the address still contains the revoked token — select another one. - The button next to the line copies the address to the clipboard. Its tooltip shows the internal name COPY_WEBSOCKET_URL: there is no translation for it.
Below, if the application has at least one token, comes the "WebSocket Applications" block — built-in tools of the web interface:
| Card | Caption |
|---|---|
| lwParser | "Parser application" |
| lwGPS | "GPS application" |
| lwLighting 1 | "Lighting application v1" |
| lwLighting 2 | "Lighting application v2" |
| lwNodeCertify | "LoraWan device certify application" |
The button on a card opens the tool with this application's App ID and the first token in the table — not the one selected for the connection address.
Other blocks of the application page
| Block | What it contains |
|---|---|
| "Tags" | Key–value pairs |
| "Integrations" | Integrations of the HTTP, MQTT and ThingsBoard.io types |
| Codec (the title "Кодек" is not translated in the English interface) | The codec JS script. To test it, enter a hex payload and click "RUN"; the result appears in "Result" |
| "Network State" | The "Nodes activity" and "Traffic statistics" charts |
| "Data" | The table of the application's packets |
On the page of an existing application, the sidebar shows the "Websocket" and "Data" links under the "Applications" item: they jump to the "WebSocket Applications" block and to the data table. The add page does not have these links.
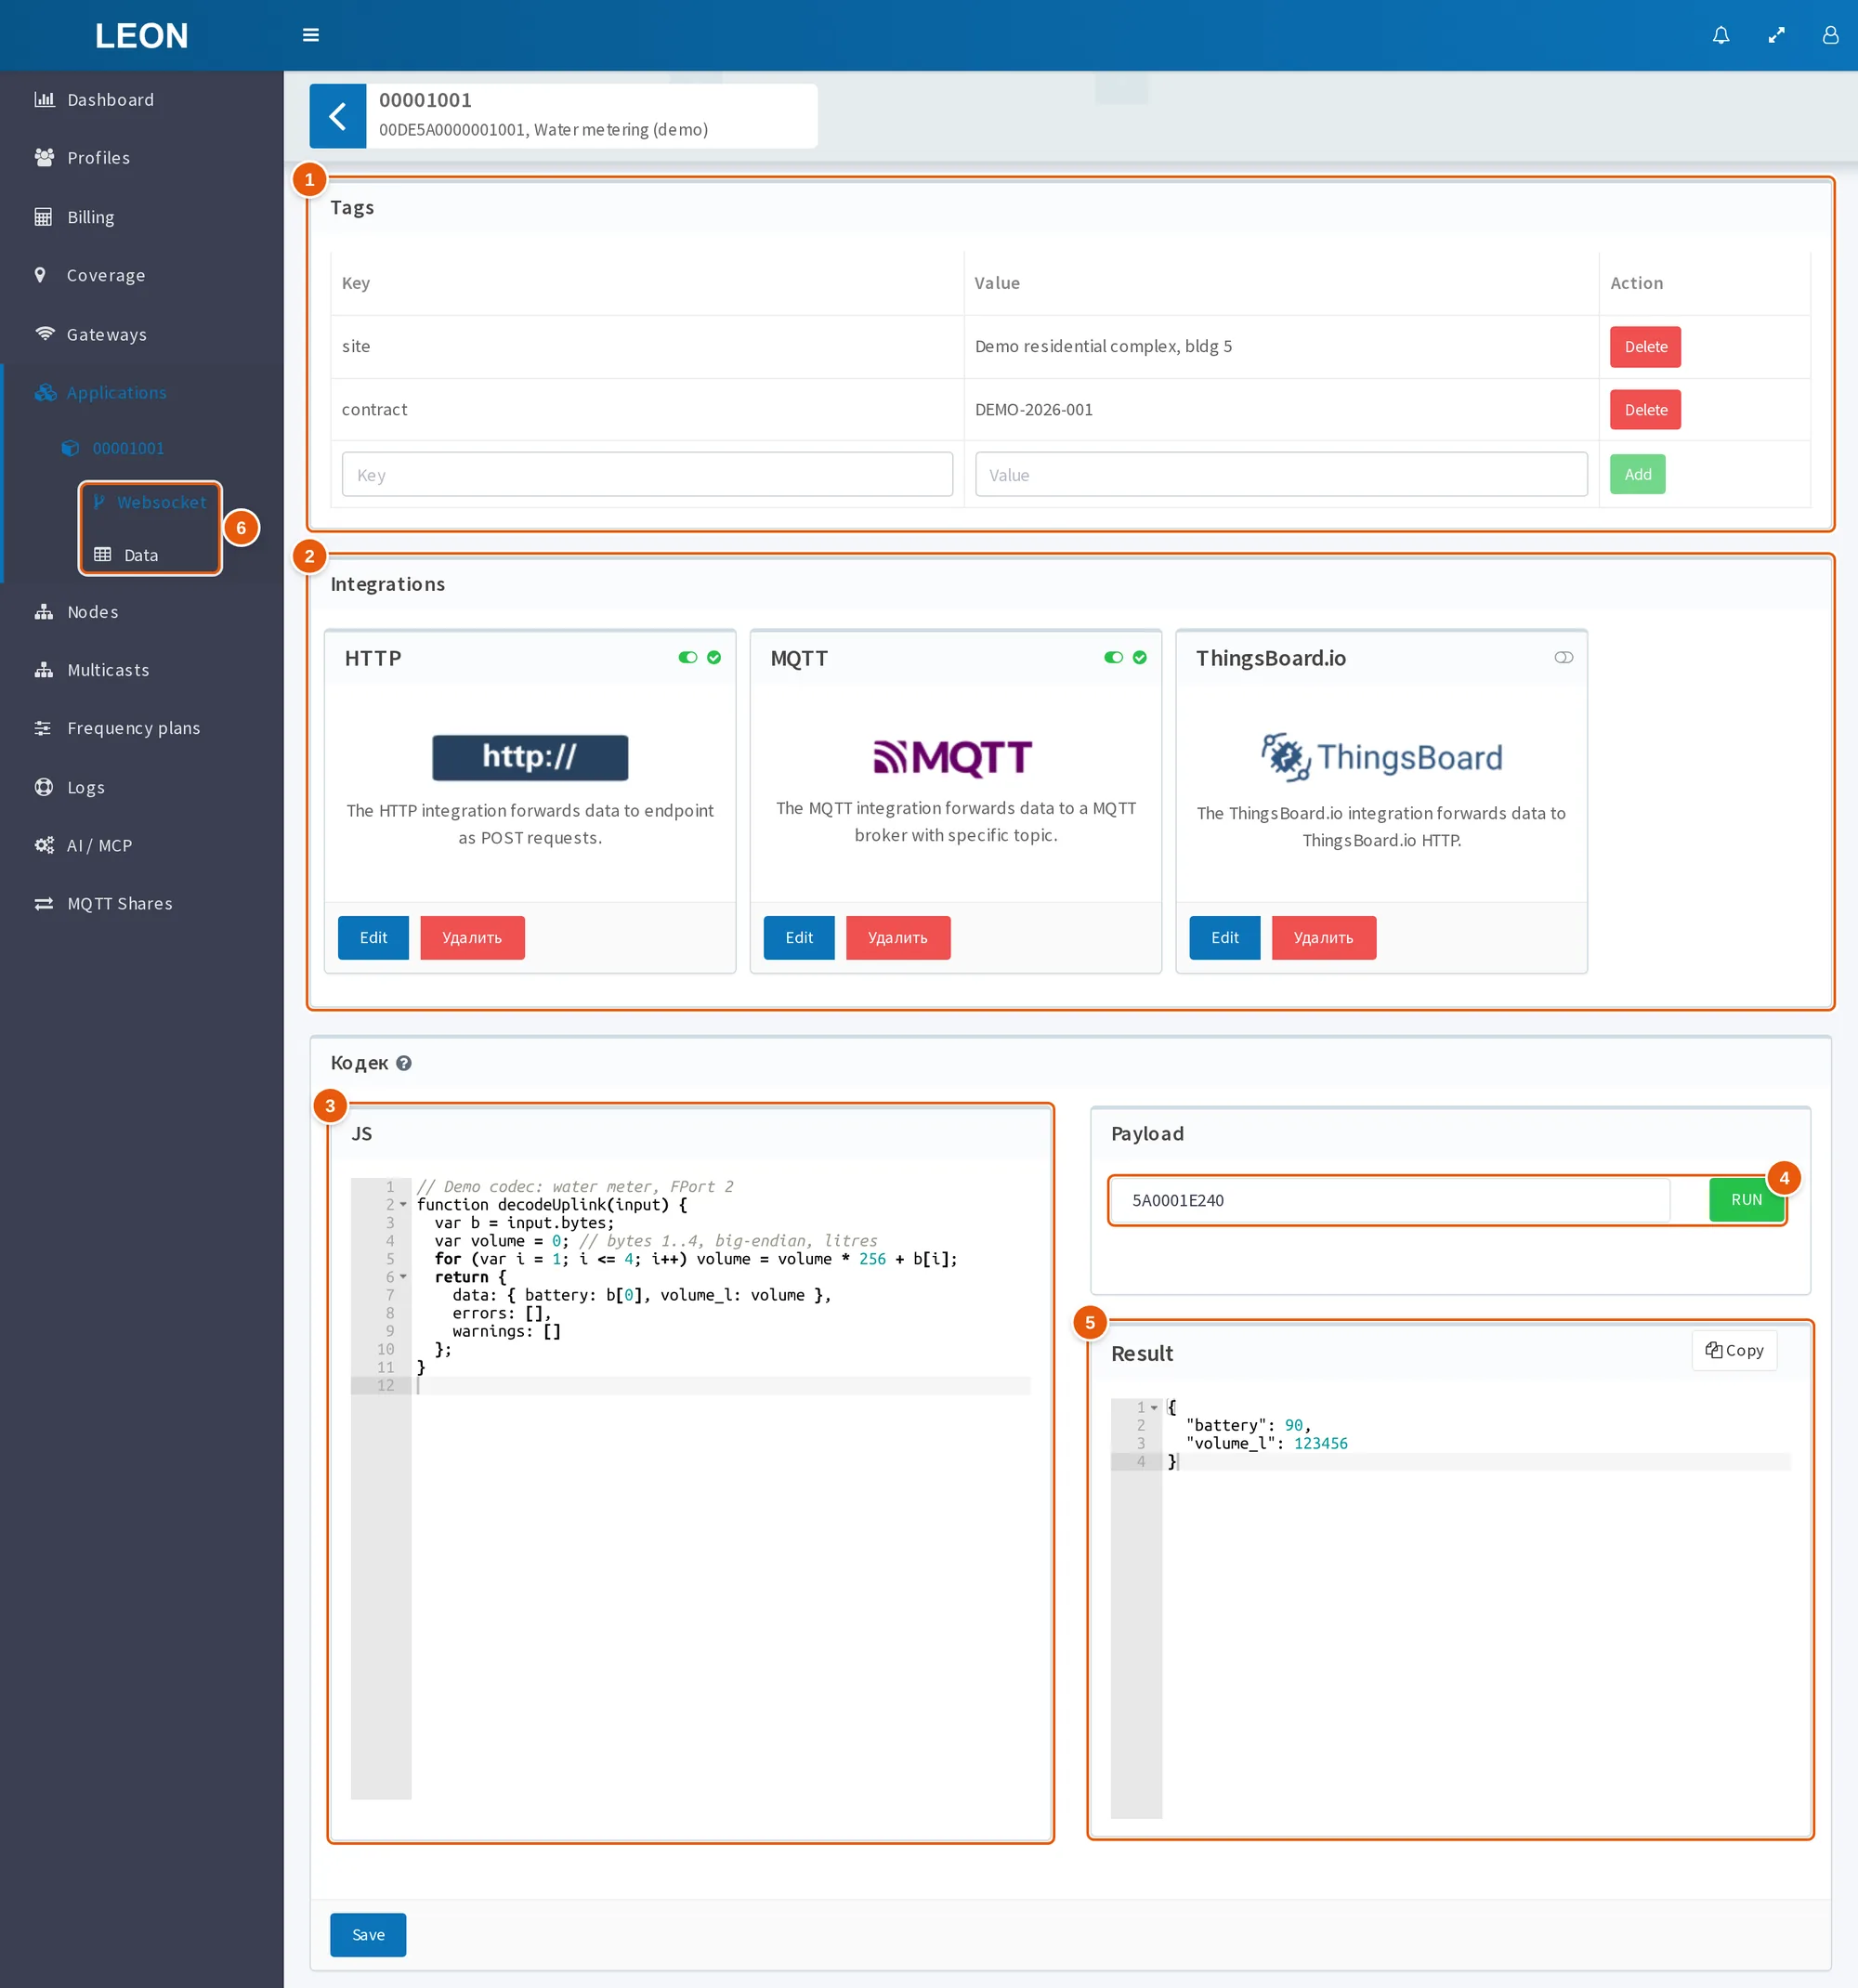
- Tags — key–value pairs.
- Integrations — HTTP, MQTT and ThingsBoard.io cards with the "Edit" and "Удалить" (delete) buttons; the delete button is not translated in the English interface.
- JS — the codec script in the codec block (titled "Кодек").
- The hex payload field and the RUN button — testing the codec.
- Result — the test result.
- The Websocket and Data links in the sidebar — jump to the "WebSocket Applications" block and to the data table.
User permissions on applications
Whether an existing application can be changed is determined by the permissions on the application itself, not by the user's groups. The owner can do everything. Others need the view or change permission on this application. Without the change permission the fields are read-only and the save buttons are not shown.
To grant or revoke permissions:
- In the list, tick the applications, choose the "Permissions" action and click "Go".
- In the "Assignment of permissions" dialog, choose the "User" and the "Permission" ("Revoke" is selected by default).
- Click "Ok".
- Confirm the "Permissions will be assigned to selected objects" dialog with "Ok". The result is the message "Permissions successfully assigned".
| "Permission" value | What the user gets |
|---|---|
| "Revoke" | The view and change permissions are removed |
| "View" | The view permission; the change permission is removed |
| "Change" | The view and change permissions |
A user other than the superuser can grant permissions only to their own child accounts and only on applications they own. For the other ticked applications the server returns "Permission denied", but still assigns the permissions on the user's own applications. In this case the web interface shows no clear message about which applications were rejected.
Deleting an application
- In the list, tick the applications, choose the "Delete" action and click "Go".
- Confirm the question "Are you sure you want to delete applications" — the App IDs of the selected applications are listed below it.
- If all ticked applications are deleted, the message "Applications deleted" appears. If at least one cannot be deleted (no permission), the waiting dialog closes without a message and the list is not refreshed — reload the page and check the result.
The server does not delete an application the user does not own and returns "Permission denied": the web interface grants only the view and change permissions, there is no delete permission among them. The superuser can delete any application. The other ticked applications are deleted in this case too.
The application is not erased from the database: the server marks it inactive and records the deactivation date, and the application disappears from the list. Along with it:
- the application's devices are also marked inactive — those the user is allowed to delete;
- all tokens of the application are revoked;
- links to it disappear from the "Accessible apps" field of other applications.
Deleting in the web interface also deactivates the application's devices. The WebSocket API command delete_application_req does not delete devices.
Good to know
- An application created in the web interface has no tokens: without a token you cannot connect to the WebSocket API. Add a token on the application page.
- You cannot clear the "Accessible apps" field completely through the web interface: the server ignores an empty list and keeps the old links. Removing some of the applications while keeping at least one works, but the save buttons are enabled only if you also change another field, for example "Name".
- The connection and subscription limits trigger one step later than the field names suggest: with "Clients limit" = 2 three connections open, with "Consumer limit" = 1 two connections subscribe.
- With an empty search box, the "Select all (N)" link acts only on the rows of the current page.
- The "Accessible apps" picker offers only the 50 most recently created applications. If there are more, an older application does not appear there, even if you type its name.
- Tools from the "WebSocket Applications" block open with the first token in the table, not the one selected for the connection address.
- Deleting in the web interface deactivates the application's devices, revokes its tokens and removes links to it from other applications.
See also
- Basics — tokens and access levels in the WebSocket API.
- Connection — address, token check, connection errors.
- Subscribe to real-time data — subscription, automatic subscription, subscription limit.
- Create application — creating an application through the WebSocket API.
- Delete application — deleting an application through the WebSocket API.