Profiles
The Profiles section of the ONS web interface manages user accounts. Here users are created and deleted, given a type and permissions and access to devices, applications and gateways; here you can also log in under a user's account and send users notifications. The section is open only to the superuser and to Dealers.
What a profile is
A profile is an ONS user account. It is not a device profile or a LoRaWAN service profile. Besides the username, email address and password, a profile has:
| Field | What it stores |
|---|---|
| Parent | The profile that created this profile |
| Profile type | Administrator, Dealer or Monitoring; the type determines the permissions |
| Description | Free text up to 255 characters |
| Active flag and deactivation date | On deletion the profile becomes inactive and the deletion date is saved |
A profile you create becomes your child profile: you are recorded as its parent. That is why it appears in your list and why you can log in as it.
Who can open Profiles
The interface opens the "Profiles" menu item and the /profiles page only to the superuser and to Dealers. Everyone else is redirected to the login page /login.
The interface shows the "Add profile" button and the "Delete" and "Send notifications" actions to the superuser and to the admin and profile_admin groups. A Dealer belongs to the admin group, so on this screen both the superuser and a Dealer have them.
Profile types and permissions
The profile type sets the user's groups, and the groups set the permissions and menu items. If no type is sent (for example, in an API request), the server sets Administrator; in the create form the type must be chosen explicitly. Groups are recalculated every time the profile is saved: the groups required by the type are added, and the rest of the three groups admin, dealer and monitoring are removed.
| Profile type | Groups | Menu items | Default permissions |
|---|---|---|---|
| Administrator | admin | Dashboard, Gateways, Applications, Nodes, Multicasts | Applications, gateways, devices, application tokens — add, change, view. Coverage networks — add and view. Data, ADR log, tariffs, outputs (Output) — view, plus the add_data permission. No delete permissions and no permissions on profiles |
| Dealer | admin, dealer | The same plus "Profiles" | Administrator permissions plus add, change and view profiles |
| Monitoring | monitoring | Dashboard, Gateways, Applications, Nodes, Multicasts | View only: applications, application tokens, coverage networks, data, gateways and their images, device joins (join), devices, outputs, tariffs, ADR log. In addition, the add_data permission |
The "Billing", "Coverage", "Frequency plans" and "AI / MCP" items are visible to any logged-in user, "Logs" only to users with the staff flag, "MQTT Shares" only to the superuser and only on installations where this feature is enabled. The interface builds the menu from the groups and the superuser and staff flags the server passes to it at login in the token (JWT).
The server sets the default group permissions during the initial database setup; on a particular installation they may have been changed.
Monitoring cannot edit device, gateway and application cards: the interface allows editing only to the superuser and to the admin and node_admin (for gateways and applications, application_admin) groups.
Profile list
The list shows the profiles you created and the profiles you have been granted permission to view. The superuser sees all profiles. Deleted profiles are not shown.
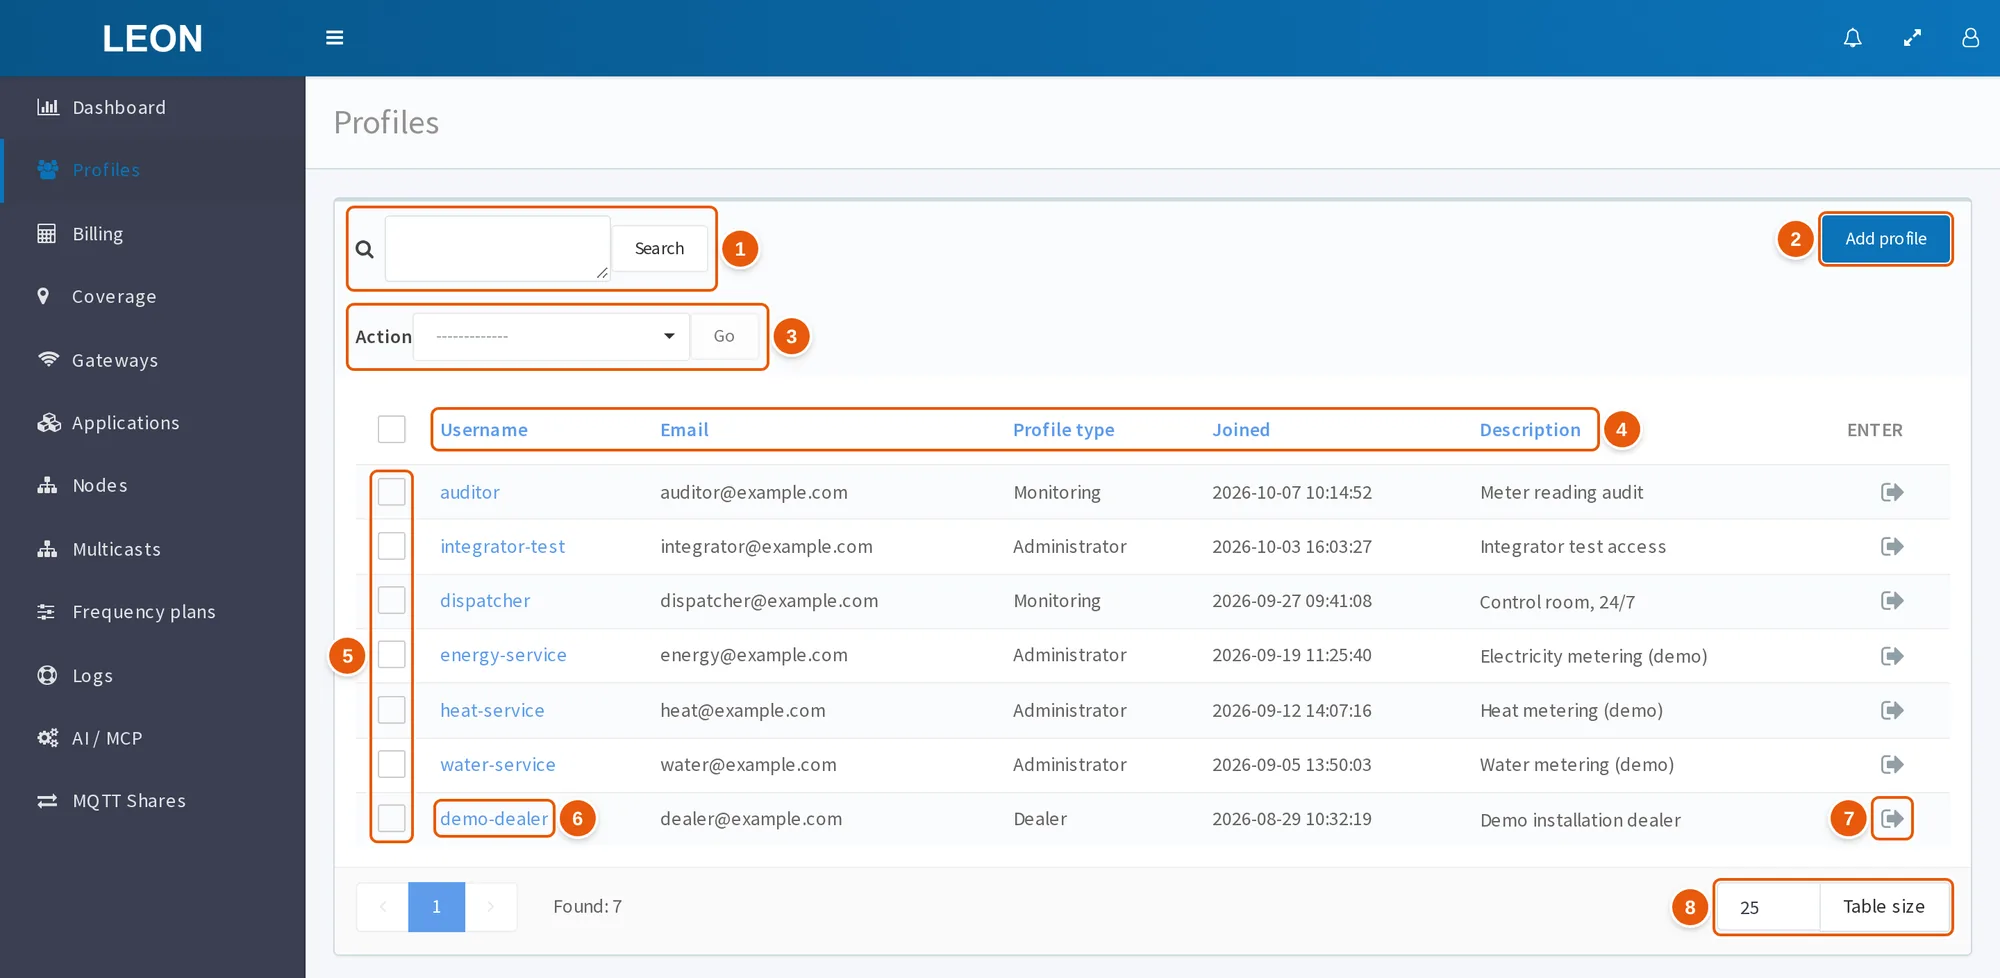
- The search box and the Search button — search by username, email and date joined, see "Search" below.
- Add profile — opens the new profile form, see "Creating a profile".
- Action and Go — "Delete" or "Send notifications" for the selected profiles.
- The headers of the first five columns — click to sort the list.
- Row checkboxes — select profiles for an action.
- Username — click to open the profile edit window.
- The icon in the ENTER column — log in as the profile, see "Logging in as a profile".
- Table size — rows per page, 25 by default.
| Column | What it shows |
|---|---|
| Username | Login name. Clicking it opens the profile edit window |
| Email address | |
| Profile type | Administrator, Dealer or Monitoring |
| Joined | Creation date and time in the yyyy-MM-dd HH:mm:ss format |
| Description | Text from the "Description" field |
| ENTER | Icon for logging in as the profile, see "Logging in as a profile" below. The header shows the ENTER key: it has no translation |
Sorting. Clicking the header of one of the first five columns sorts the list in ascending order, a second click sorts in descending order, a third click resets sorting.
Search. Type text into the search field and press "Search" or Enter.
- One line: each space-separated word must occur, case-insensitively, in the username, email or date joined.
- Several lines, for example a pasted list: a profile is found if any line exactly matches its username or email.
"Found: N (Total: M)" appears next to the field. Clicking "Total" resets the search.
Page size. A page shows 25 rows by default. To change the number, enter it in the field next to the "Table size" button and click the button.
The browser remembers the page number, the search string, the sorting and the table size (localStorage, key profile_list).
Creating a profile
- Click "Add profile".
- Fill in the form fields.
- Click "Create".
| Field | Requirements |
|---|---|
| Username | Required, at least 3 characters |
| Email address | Required, a valid address |
| New password | Required, requirements below |
| Retype Password | Required, must match the password. Otherwise the form shows "Password does Not match" |
| Profile type | Required: Administrator, Dealer or Monitoring. Nothing is selected in a new form |
| Three checkbox blocks | Access to objects, see "Access to objects" below |
| Description | Multi-line text up to 255 characters |
Password requirements:
- The form: at least 8 characters, at least one uppercase letter, one lowercase letter and one digit. If the password does not fit, the form shows "Password must contain at least 8 characters, one number, one lower and upper case character" under the field.
- The server additionally applies standard password strength checks: the password must not be shorter than the minimum length, appear in the list of common passwords or consist of digits only; when changing an existing profile's password, it also must not be similar to the profile's data. If the check fails, the server responds "The password is incorrect.".
Editing a profile
Clicking a username in the list opens a window with the same form. The window title is "Profile" followed by the username.
- The username cannot be changed: the field is locked.
- The password may be left empty — the hint says "The result remains the same if you leave the field blank". The interface does not send an empty password.
- If you change the profile type, the groups are recalculated on save, see "Profile types and permissions".
Click "Save". After saving, the "Profile changed" message appears.
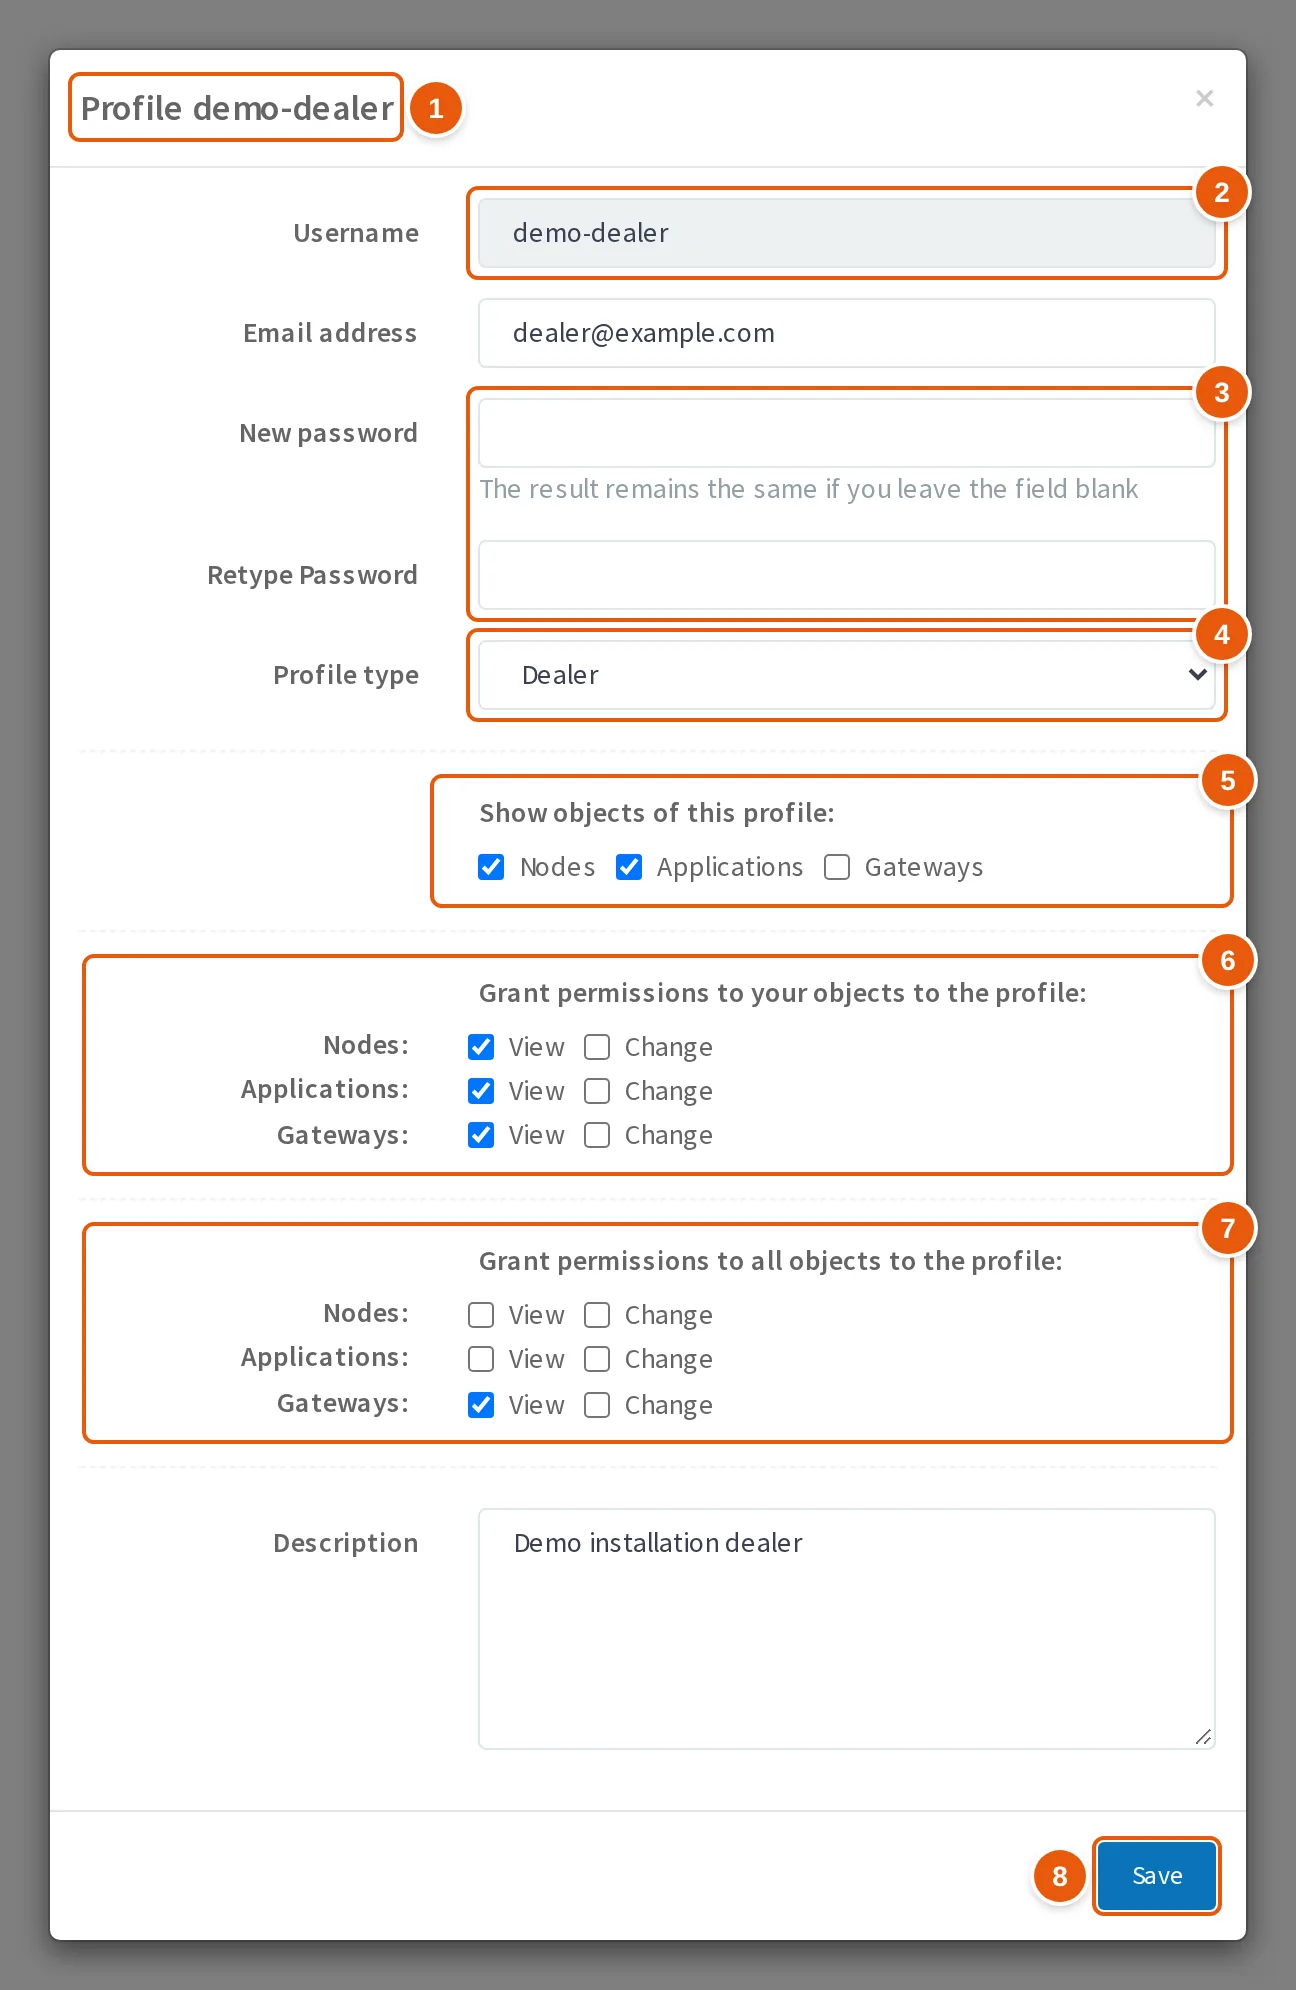
- The window title — "Profile" followed by the username.
- Username — locked, it cannot be changed.
- New password and Retype Password — may be left empty, then the password does not change.
- Profile type — Administrator, Dealer or Monitoring; it determines the groups and permissions.
- Show objects of this profile — you get permission to view this profile's objects, see "Access to objects".
- Grant permissions to your objects to the profile — the profile gets permission to view or change your objects.
- Grant permissions to all objects to the profile — the block is visible only to the superuser. Here "View" is on for gateways, so it is also shown as on in the "Grant permissions to your objects to the profile" block.
- Save — saves the profile and the permissions.
Access to objects
Objects here are devices ("Nodes" in the interface), applications and gateways. Access to them is set by three checkbox blocks in the profile form. Clearing a checkbox revokes the granted permission.
| Block | Checkboxes | What it grants |
|---|---|---|
| "Show objects of this profile" | "Nodes", "Applications", "Gateways" | You get permission to view the objects owned by this profile. They appear in your lists |
| "Grant permissions to your objects to the profile" | For nodes, applications and gateways — "View" and "Change" | The profile gets permission to view or change the objects you own |
| "Grant permissions to all objects to the profile" | The same | The profile joins the shared group super_view_<type> or super_change_<type>, to which the server assigns permissions on every object of this type created in the web interface. The block is visible only to the superuser |
A device is owned by the owner of its application.
Permissions from the first two blocks are stored in the groups view_<type>_<owner name> and change_<type>_<owner name>. When an application, gateway or device is created in the web interface, the server immediately assigns permissions on it to these groups and to the super_view_<type> and super_change_<type> groups, so the granted access also covers objects created later. Objects created another way get fewer permissions. A device created through the WebSocket API (Create device) or the MCP server gets permissions only for the view_node_<owner name> and change_node_<owner name> groups, without the super_* groups. An application created through the WebSocket API (Create application) gets no group permissions.
If a checkbox is on in the "Grant permissions to all objects to the profile" block, the checkbox for the same permission in the "Grant permissions to your objects to the profile" block is also shown as on.
Logging in as a profile
- Click the icon in the last column of the profile row.
- Confirm in the "You are going to change account to: …" window; it shows the profile name.
The page reloads under that account and with its permissions.
You can log in only as your direct child profile — one you created. The superuser can log in as any profile.
There is no separate button to return to your own account. "Exit" clears both your login token and the child profile token, after which you have to log in again.
Deleting a profile
- Select the profiles with checkboxes.
- In the "Action" list, select "Delete".
- Click "Go".
- Confirm: "Are you sure you want to delete profiles".
Only the profiles you created and those you have the delete permission for (delete_profile) are deleted. The rest are skipped, and the interface shows "Profiles deleted with errors".
Deletion does not erase the record but deactivates it:
- the profile is marked inactive and gets a deactivation date; it disappears from the list;
- permissions between you and the profile are removed the same way as when clearing checkboxes. If the profile had been granted access to your objects (or the checkbox was shown as on because of the "Grant permissions to all objects to the profile" block), the server revokes it from the whole shared group, so the other profiles you granted it to also lose access to your current objects. If you could see the profile's objects, everyone who saw them through the same group loses that access (see "Good to know"). Other users' permissions on the profile itself are removed too;
- a "Deletion" entry is written to the user action log for every selected profile, including those skipped for lack of permissions.
Sending notifications
- Select the profiles with checkboxes.
- In the "Action" list, select "Send notifications".
- Click "Go".
- In the window that opens, check the list of recipients and fill in the fields.
- Click "Send".
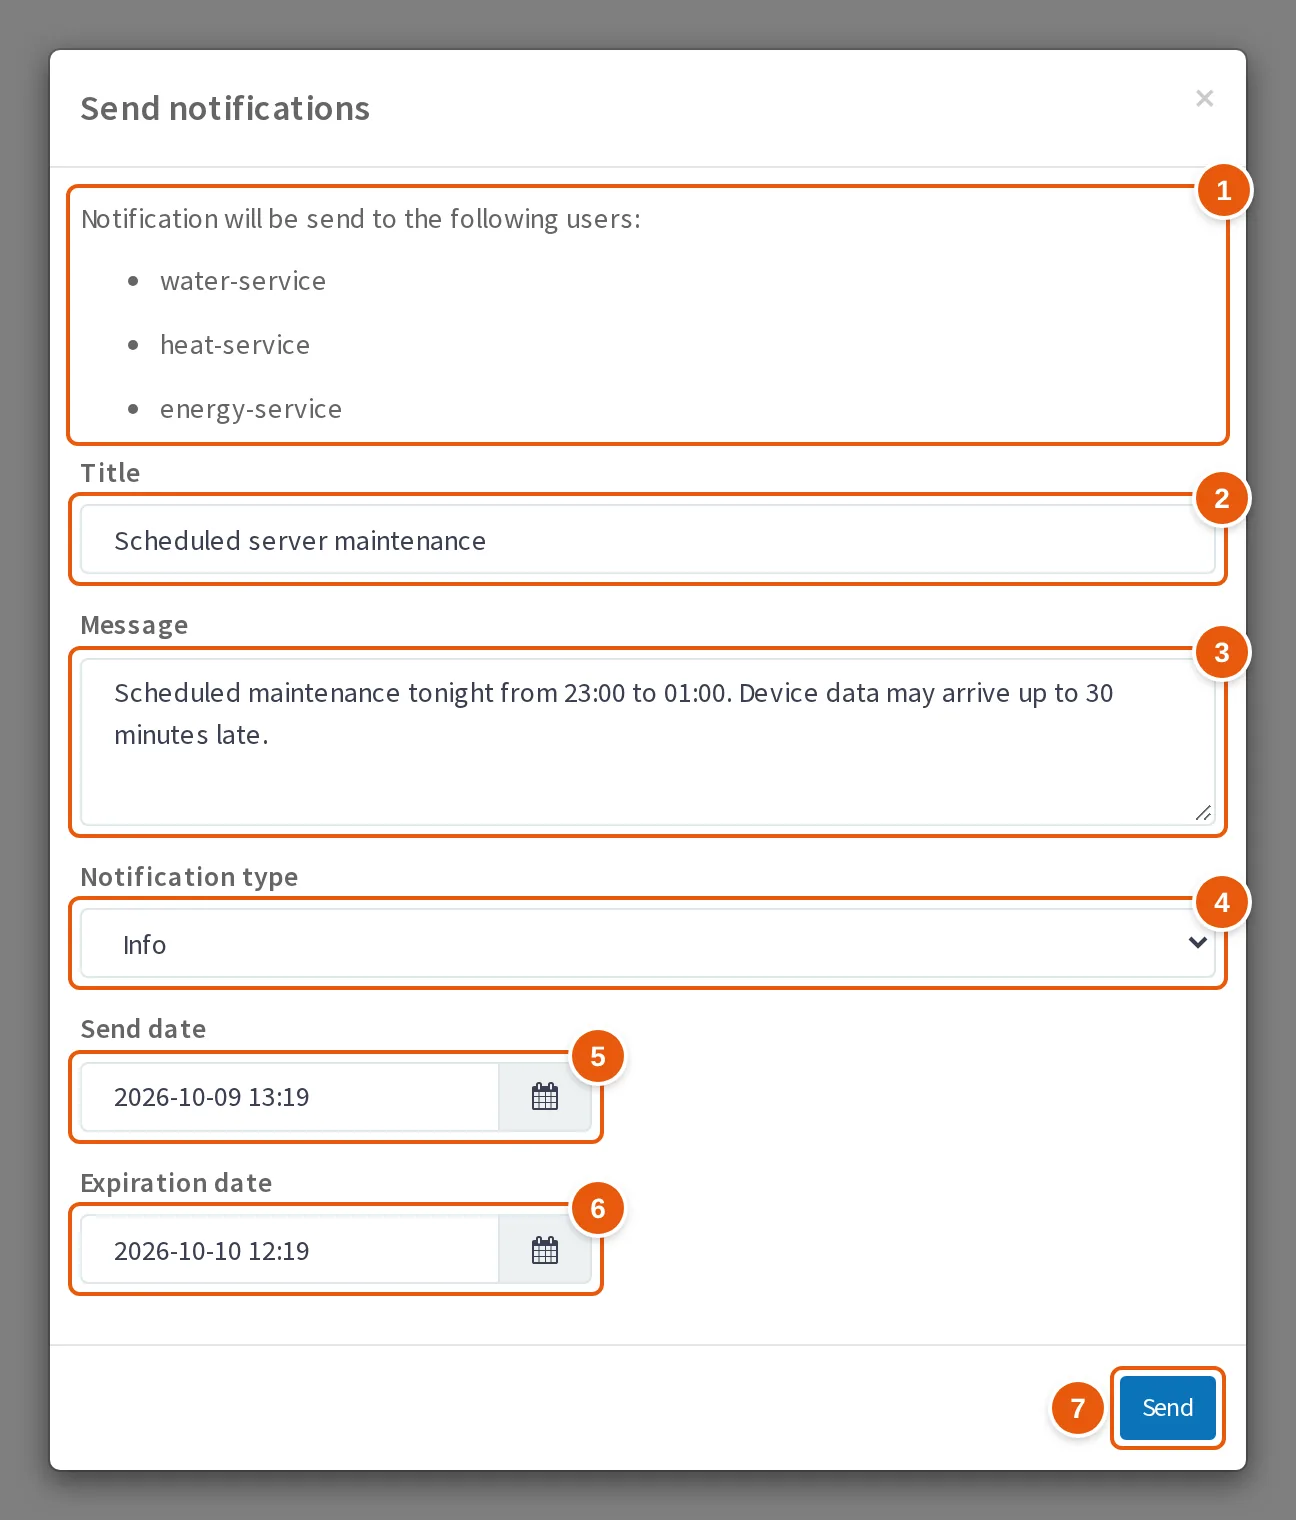
- The recipient list — the profiles selected in the list.
- Title — the notification heading.
- Message — the notification text.
- Notification type — Danger, Warning, Info or Success.
- Send date — when the notification goes out to the recipients.
- Expiration date — until when the notification is shown.
- Send — creates the notification.
| Field | Value |
|---|---|
| Title | Required |
| Message | Required |
| Notification type | Danger, Warning, Info or Success; Danger by default |
| Send date | Required; 1 hour after the Profiles page was opened by default |
| Expiration date | Required; 24 hours after the Profiles page was opened by default |
Dates are entered in the YYYY-MM-DD HH:mm format.
The server allows creating a notification only to a user in the admin group; a Dealer belongs to it. At the "Send date" the recipients receive an email. The notification appears in the new-notifications list under the bell icon in the header from the send date until the expiration date, until the recipient marks it as read. On the Notifications page (/notifications) it stays visible after being read if its send date falls within the period selected there — the last 24 hours by default.
Good to know
- View access to a profile's objects is stored in one shared group. It includes both those the profile itself granted permission to in the "Grant permissions to your objects to the profile" block and those who checked "Show objects of this profile" for it. Clearing a checkbox revokes the group's permission on the profile's current objects — all members of the group lose access to them, not just one user. Permissions on your objects work the same way: clearing a checkbox in the "Grant permissions to your objects to the profile" block revokes the permission of the
<permission>_<type>_<your name>group on your current objects, and all profiles you granted it to lose access to them. - After a profile is deleted, the server rejects WebSocket API connections with tokens of applications it owns with error 1: a token is accepted only if the application owner's account is active. The applications themselves are not disabled when the profile is deleted.
See also
- Connection — application token check and error 1 when the owner's account is inactive.
- WebSocket API basics — application tokens and their access levels.
- Logs — the user action log, including profile deletion entries.